Home/ Projects / Raspberry Pi/ Access Raspberry Pi using SSH and VNC viewer in Linux. Raspberry Pi Tutorial Part 2
We are having two options to take the display of Raspberry Pi to an external device, One is the HDMI out and the other is composite out. Most of the monitors now in market are capable of supporting HDMI input, so we can connect the Pi directly to these types of monitors. You can hook it up to an old analogue TV through the composite out of the Rpi but this reduces the clarity of display.

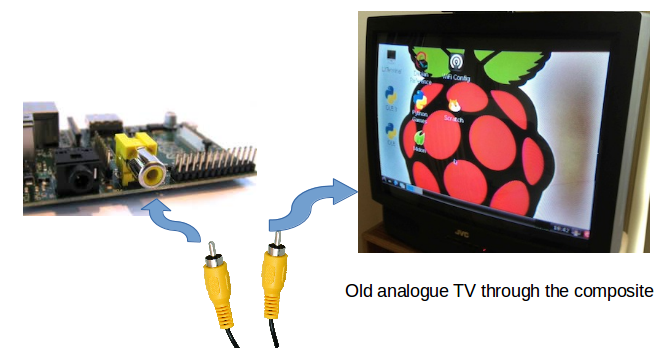
The best display we can have is the HDMI, but most of the monitors that were in use today do not support HDMI, they were using VGA connection, but unfortunately the chip that used in Rpi supports HDMI and composite outputs but does not support VGA and VGA is considered to be an end-of-life technology.
You can use a HDMI to VGA converter by connecting its HDMI end to the Rpi and the VGA end to your monitor. But the converter is very costly and the chance to work is very less. So before you get your HDMI to VGA converter make sure that it will work with the Pi.
Suppose a person is not having a HDMI monitor, an old analogue TV or a HDMI to VGA converter, how can he access the display of Pi?
Other than the above mentioned ways there is one more way to capture the display of Raspberry Pi into our Laptop screen, it's by running a VNC server in our Raspberry Pi and a VNC client in our Laptop. Let us discuss how we can configure a VNC server in Raspberry Pi and client in our Laptop.
To install VNC server in Rpi we need some type of connection between our Laptop and the Raspberry pi, this connection is established using an Ethernet cable as shown below.

Just connecting the Pi and Laptop using an Ethernet cable will not serve our purpose; we have to change some network settings in Linux systems in order to establish the connection.
As soon as when you connect with the Pi, you may be able to see an Ethernet connection listed along with other connections in your laptop, sometimes it will be listed like “Auto Ethernet”. But when you try to connect it, it may fail. For successful connection take your terminal window and run “nm-connection-editor” as shown.

This command will open your network settings as shown below
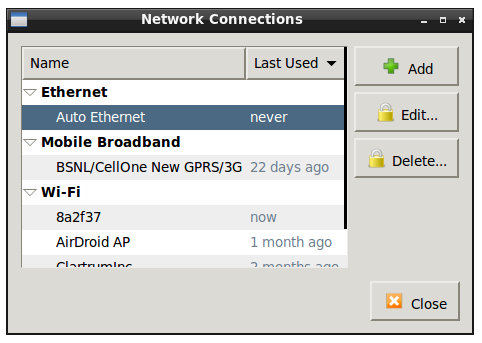
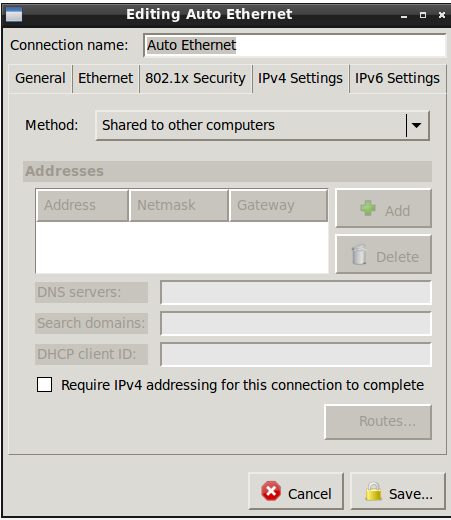
Then select the Auto Ethernet and click on Edit option, you will get another window named as Editing Auto Ethernet. Move on to the option Ipv4 settings the default selection in the tab will be “Automatic DHCP” change this option to “Shared to other computers”, after changing the option save the configuration and close the Network Connections. Now if you try to connect using “Auto Ethernet” you will get a message like “Connected Auto Ethernet”.
Now our Pi is connected with our laptop, the next step is to communicate with the Pi. In a network, suppose a device needs to communicate with another device IP address is necessary. Since DHCP is enabled by default in Raspbian OS, the Pi is able to get an IP address when this connection is established.
To find the IP address of the Pi we can use the terminal window of Linux and type the following command
If you are using a debain based system like Ubuntu, you can use the command below

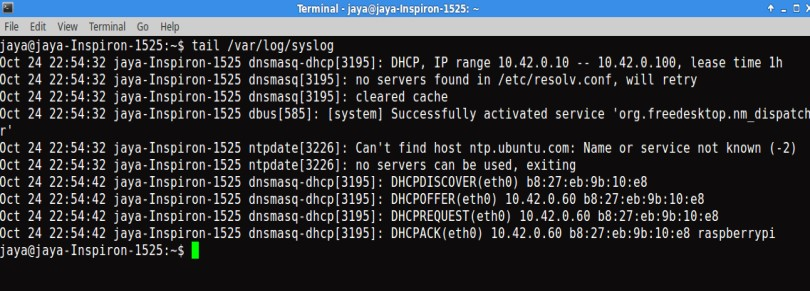
When this command is executed you can see various details listed within that you may be able to see a line which ends in “raspberry pi”, within that line you can see the IP address of the Pi along with the hardware address listed there. So here the IP address listed is “10.42.0.60”
If you are using an rpm based system like Fedora, you can use the command below to get the IP address of the Pi.

After obtaining the IP address of the Pi, we have to use SSH command to login into command window of the Pi. We are communicating now with the Pi using the SSH connection, try using the following command in your laptop's terminal window.

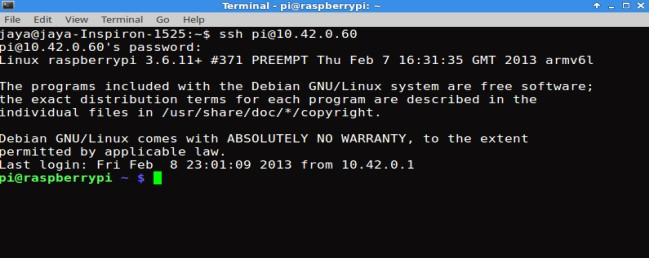
If you are able to login into Pi, you can see that your command window user turns to “pi@raspberrypi”
Now if your Laptop is connected with the internet automatically your Pi will be also sharing that Internet connection, so make sure that your laptop is connected with the Internet.
Then for updating the Raspbian OS, run the following command in the Raspberry pi terminal

After updating the OS of the Pi, you can now install the VNC server in your Pi. For that use the following command to install the VNC server.

Make the VNC server running in our pi along with the custom geometry of display we needed in our laptop, for the first time an eight digit password should be entered and enter ‘no’ for next question.


Now we have configured the VNC server in our Raspberry Pi, also now we are able to communicate with the Pi trough the command line, but we are not able to see the display of Rpi, for that we need to configure the VNC client in our laptop.
Now take another terminal in our laptop and enter the following command to install the VNC viewer.

After installing VNC viewer, run it in terminal using the following command

When “ vncviewer” command is issued, a small window asking server will come, enter the IP address of our pi followed by a ‘:1'

When we press enter a password will be asked, enter the password which we entered above

That’s all now we are able to get the display of our pi inside our laptop.